Monday, December 10, 2012

Preview

I figured I had done enough posts without any pictures so here is one. Ari's stocking close to finished. Sleeves and the pink pieces of the skirt are only pinned in place. Ready to do the embroidery tomorrow.

Friday, December 7, 2012

Stockings galore!

I just found two stocking kits from 1998 and 1999 cheap on EBay! I'm stoked! They are super cute. Normally I don't like the older Bucilla designs but these two were too cute to pass up. I did some research and found out that these were designed by Maria Stanziani who does the current designs I have become addicted too. Go figure. I haven't had a moment to spare for minis because I have been sewing like mad and am enjoying every minute. I have finished my aunt and Uncle's stockings, they were so much harder to do because they had requested hem be 3 inches longer. So I added a 3 inch cuff and sewed a semi removable lining so the stress when filled wouldn't be put on the seam. Then I had to wait for my felt order to arrive for the backs. Bucilla's patterns are adorable but I don't think they are designed to actually be used. I cut new backs to give more room. They look great. I have one finishing touch to add to my uncles and I can mail them out, hopefully tomorrow. Once they recieve them i'll post pictures of them.
My niece's stocking is close to half done. After that I have 2 more I need to finish by Christmas. I've been working late each night so my sew time has really been crimped. I better get cracking though. Not that long till Christmas Eve. I am looking forward to when those are done so I can work on one I want to rather then the one I have to. Too much fun!

Friday, November 16, 2012

Bathroom furniture and a kitchen hutch

Well I have completed the bathroom furniture of the Pickett hill and started the kitchen. I have the pie cupboard done except the counter and the sink finished minus the knobs and the stove begun. I am waiting for the whole kitchen to be assembled so I can do all the counter tops at once.
Tonight I started my 1/2 scale Colonial Christmas house. I cut the opening for the second floor stair case, stained and glossed the floors and painted the exterior walls. I believe this will become another house I will be emotionally attached to. My dad chose the stain color and my daughter "helped" me paint the walls. I'm happy with the progress. Tomorrow I am hoping to route the grooves for the wires and drill the two holes in the front of the house for the coach lights. I will also start the window painting.
My nieces stocking is shaping up well. I finished the top cuff and have the cuff trim sewn in place. These stockings work up quickly. I placed an order for more felt for new backs and liners and am anxiously waiting for them to arrive. Sorry about the crooked bathroom picture I'll have better pictures soon.

Friday, November 9, 2012

Perfect weather

I just had to share. Woke up to the most perfect weather, cloudy, drizzling and chilly! I'm in heaven. I may live in the wrong state, bright sunlight gives me headaches, I'm one of the palest residents of Arizona because I avoid the outdoors during sunny hours. LOL my DH mentioned in passing we should move to Oregon and I balked at first, I hate the idea of leaving family behind, but the more I think of it the more I want to try it. Can't imagine what it would be like to be able to go outside in the daytime and not squint behind dark glasses.

Thursday, November 8, 2012

Sewing is fun!

Well, no progress has really been made in miniatures. At least none that can be photographed to show a huge change. I finished the hollyhocks and "planted" them around the Pickett Hill. I'm really pleased with how they came out. I moved on to painting the fern leaves and stopped. Had a shocking comment from my hubby about it. He saw the Pickett Hill and said he doesn't mind those houses it's the massive 1/12 scale he doesn't like. I interpreted that as "go ahead and do as many quarter scale as you want and I won't complain" : ) closest thing to a compliment about my miniatures I've gotten from him so I'm taking it! LOL

I have 't been idle though. Aidan's and Elora's stockings are 100% complete. I lined the inside with another piece of felt and cut a bigger back from the same felt. The one that came with it was too small you could hardly put anything in it. I've also finished the fronts of my aunt and uncle's stockings. Waiting for the order of more felt to come in before I can finish and mail them to them. Their's will be harder. They requested an additional 3 inches be added to their's so i am making a three inch cuff and will have to use a fabric liner and a bigger back felt piece, which is why i needed to order more felt. I want the felt to match the fronts. Elora's worked with two colors but if i try that with a cuff it would be too patchy. Can't show my Aunt and Uncle's as they are surprises but I can show off my kids'. I have had a blast making these. I have a ton of other kits and I plan to start making them up for sale next year. I still have 3 more to do before this Christmas or I would try for this year. It has taken me approximately two weeks to complete each one. Between working full time and two kids i'd say that was pretty good.

Tuesday, October 30, 2012

Remodel Continued

Unfortunatley the order I placed for the lights fell through. I am very dissappointed. At first there was a delay of about a month where the seller contacted me to say she was having issues with her email and to let her know through her son's email if I was willing to wait just a little longer or if I wanted a refund. I told her I'd wait ... then almost two months later I still hadn't seen or heard from her. So I ended up requesting a refund and was immediately refunded. I'm definitly not happy with that type of service so I won't be going there again. Oh well.

On the up side I have finished adding bricks to the front of the house. I still need to grout/mortar them but I LOVE the way it changed the look. I also added some dentil crown moulding to the top of the front wall. It needs paint but it finishes it off nicely. I plan for 2 window boxes on the bottom two windows  and touching up the carved trim on the bottom and the front will be complete. Now I am begging family to eat more eggs so I can finish both sides. I still have the back roof to shingle but I am working my way there. The back of the house is up against a wall and I don't foresee that ever changing so doing the back to match is still up in the air. I don't know if I want to tackle that much for something that is completely hidden...we'll see. I placed one piece of trim on the top floor edge to cover the plywood and to hide the wires on the inside but otherwise the inside hasn't been really touched. I did get a nursery set from my mom when we went to Tucson for the annual show and sale. It's perfect. I'll post pictures a little later when there is more to look at on the inside.

On the Pickett Hill I have started the landscaping and worked on the bathroom. For the landscaping I have the flowers and vines to do but the large pieces are finished. I love this little house. I have an Avalon kit waiting and I want to do that in a fall theme.


Since I had to scrap my Arthur Christmas house, I won't go into the details of the demolition of it, I have decided to transform my 1/2 scale Colonial into my new Christmas house. Plus side to that is it is small enough for me to work on. I have picked out the main color of the outside, Aging Barrell by Behr LOL with cream trim work and dark shingles which will be mostly hidden by permanent snow. I want the exterior landscaping to have the appearance of a nice snow fall, the perfect white Christmas. I ordered all of my lights, and the electrical supplies I need and am just waiting for those to arrive. I also want to install a second staircase to go to the top floor. I have it planned out, bottom floor will be kitchen with small a small table and chairs and a living room. Second floor will be the Master Bedroom and bathroom with a hall and second floor stairs to lead to the third floor which will house the kids room (boy and a girl, thinking twins or close in age like my two) and a laundry room. I have found some lemax yard lights and fencing that would be perfect. For the base I want to find a picture frame, removed the glass and replace it with piece of wood. Then after the house is placed cover the whole thing in snow, except the edges of course, and add a walkway that looks like it has been freshly shovelled. Excited isn't the word for it. I have a very strong image of what this house will look like. The outside I'm hoping will have a night time feel to it with the brown exterior and snow but the inside will be light and cozy. There is a fireplace Christmas village on Etsy I am eyeing that is darling. I am having an issue with the fireplace. There is a chimney in  the center of the house, however below that is nothing. No wall, no column or illusion that it reaches anywhere. Am I crazy or does that bother anyone else? I'm think I have come up with a solution involving a fake chimney breast that leads from the first floor, to the second and then continues up through the third floor like a brick column. Maybe like an attic that was refinished into the childrens room. Not sure how I'll flesh that out but will try.

Sunday, July 29, 2012

Re-model part 2

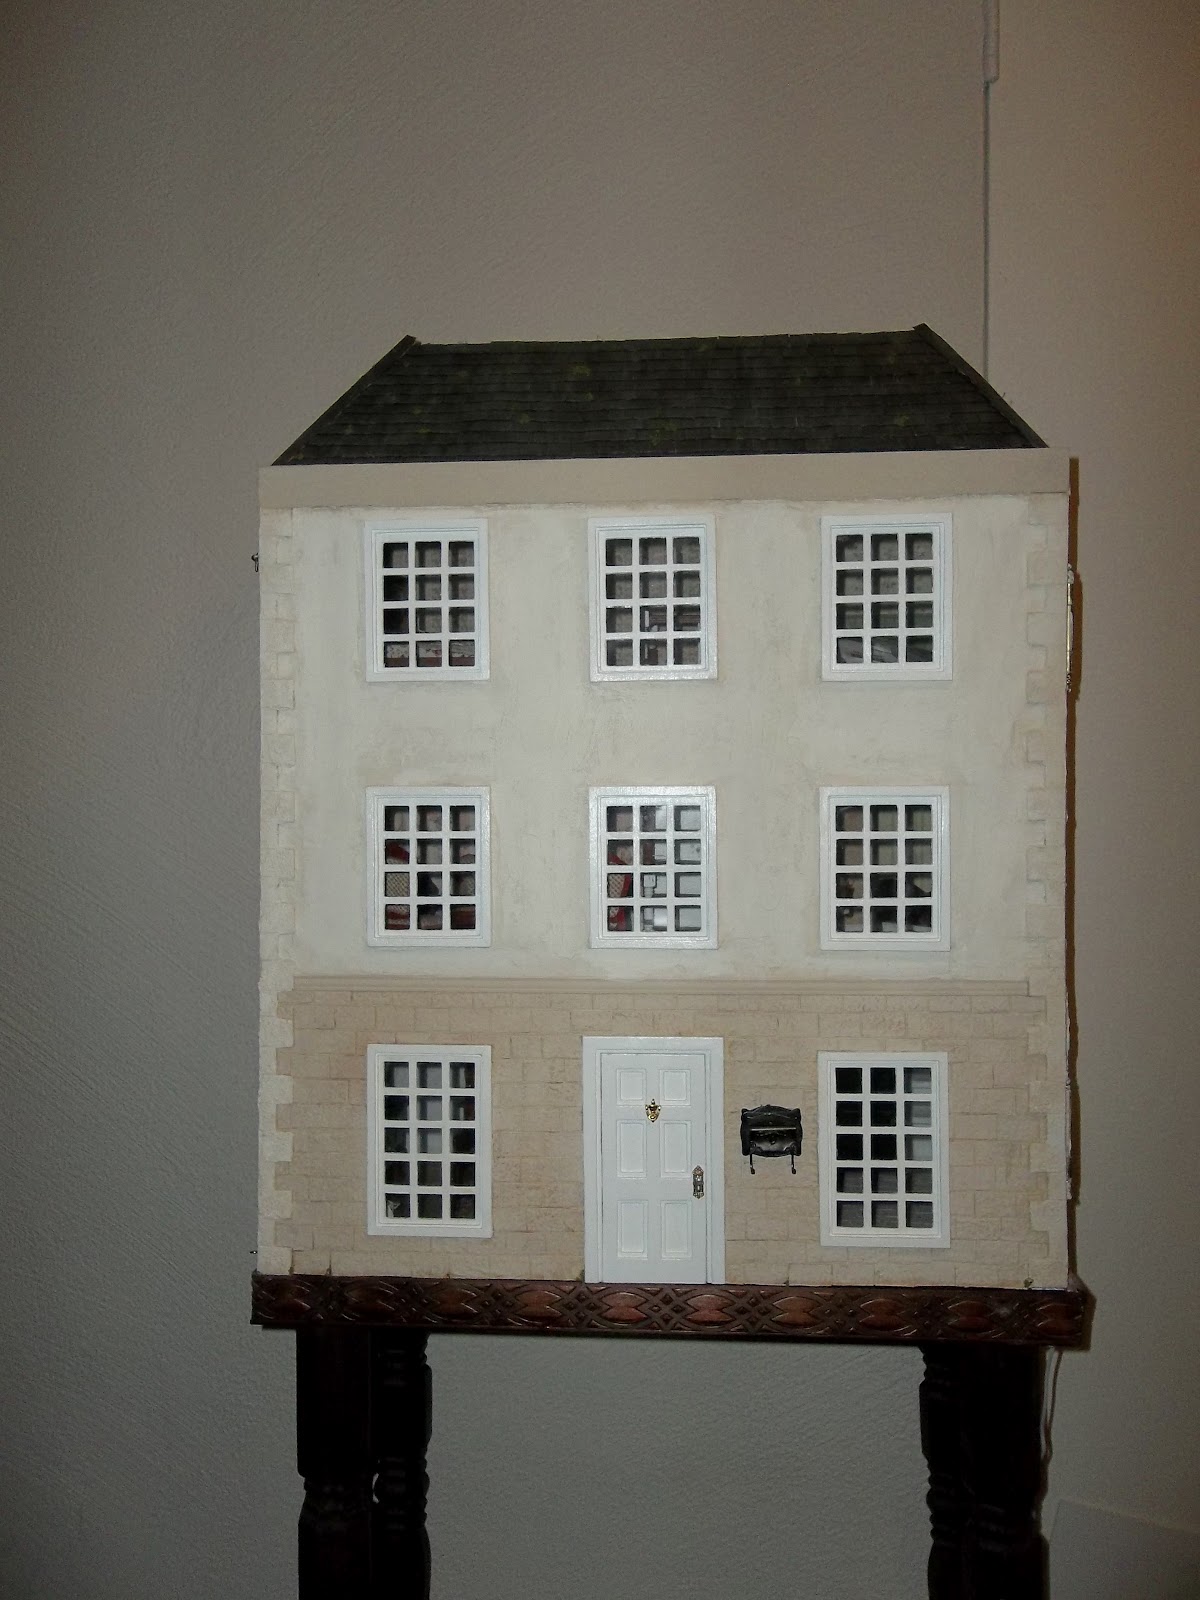
The day before last I smoothed down the plaster walls and painted them a grey color to simulate grout. That way when my grout arrives if for some reason a spot doesn't take well it won't be so noticeable with the grey color their, rather then a bright beige color. Then yesterday I began applying the bricks. I of course started on the hardest part, the front. All of those windows! It took me 4 hours to lay down 10 3/4 rows, but the time is worth it when I look at the result. I haven't smoothed out the quoins but I will do that after I finish bricking the front. I have been starring at the edges, opening and closing the door so I can see if it will possible to wrap the quoins realistically around them. So far I think it will work. I'm thinking I will need to shade the bottom block stone on bottom so that it looks aged like the top. I want to keep those the beige color though so possibly dirty washing over them all after I detail them up a bit with some other beige's.

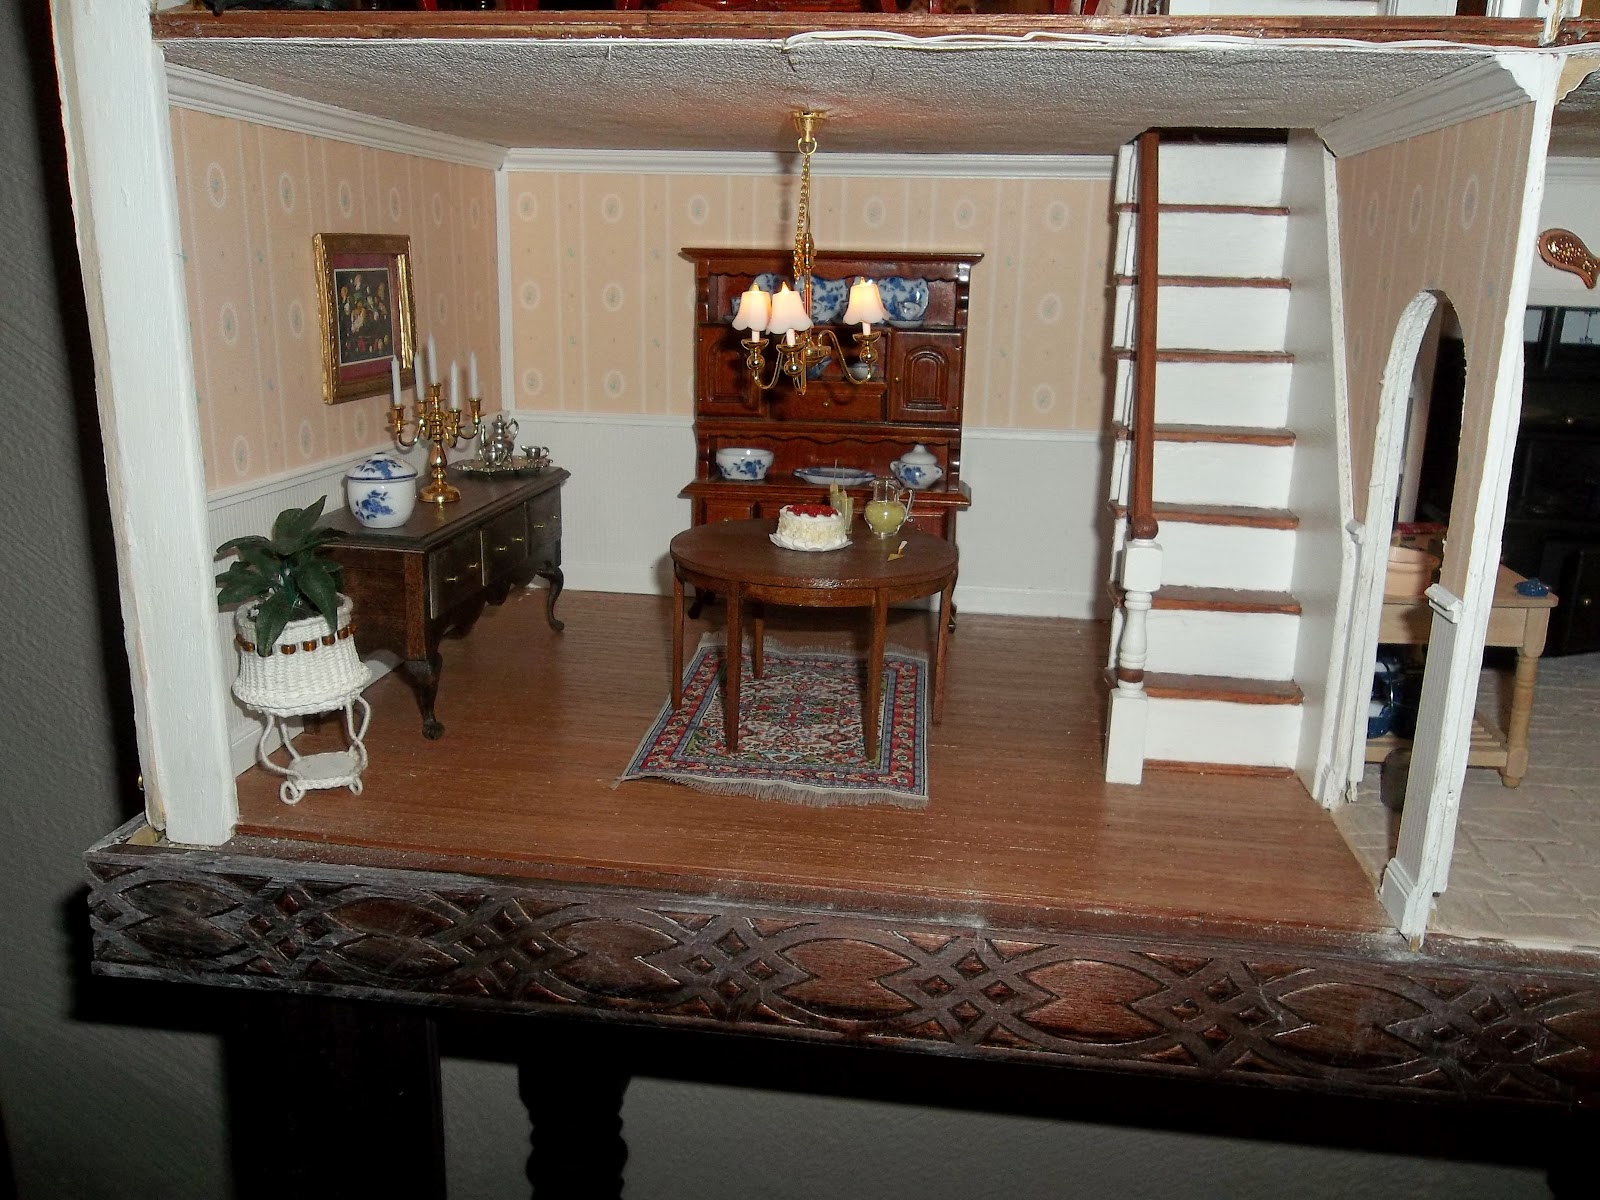
As promised in my last comment here are some pictures of the inside. It is going to be completely re-furnished and accessorized soon. I order 3 new Chrysolite lights to replace the dining room, parlour and nursery. I am looking at some Ray Storey lights for the bathroom and bedroom. I kind of like my kitchen light, it at least fits the period. However, I have seen some gorgeous more dainty scaled ones that I am fighting against. I never fight too hard so we shall see. I figured since this is the only large scale house I can work on right now, and possibly for a couple years, I am taking my time and will do it right. I will save for the details I want to make it as realistic as possible, which means changing a lot. At least I am happy with the floors, wallpapers and ceilings so all that's needing updating is the furniture and accessories.
 The floor edges will be trimmed off with some really thin strips of wood so as not to impede the closing of the front, but enough to cover the wires and trim it up. Also, that strip in the corner will be secured to the wall and a false little extension added to the side to hide it from view while turning the light switch on still easy.
 I have a nursery furniture kit I will be building and putting in here. Two items on my wish list for here is the Noah's Ark toy set and table from Cynthia Howe's miniatures and a dainty rocking horse.
 I will be keeping the fireplace but I don't know about the furniture. I may find kits to replace them so I can get a proper wood stain color. I also will be adding a stair carpet to these stairs so my mini people don't slip and fall. All of the hardwood floors will be getting another coat of varnish to make them shine.
 Again, I changed the bedroom set from what I had before but of course I'm not 100% happy with it. Maybe I'll change it for a more "hygienic" metal bedstead. : ) You know they are up and coming with the change of the century and all.
 A modern day indoor bathroom.! All the convenience you could need!. The door still needs to be painted and trimmed and the little wall still needs that bottom green border added. Still a ton of details and accessories to add, things for the walls and a mirror of some kind.

Wednesday, July 25, 2012

Remodel Part 1

I figured I should show a photo of the front of the Gloucester before I start the remodel. The bottom bricks will stay the same but will be grouted.
 This next photo is progress on the bricks. I laid the roll out flat and sponged acrylic terra cotta paint all over then added a redish brick color and just a bit of burnt umber. Then I used a paper cutter into strips 1/4" wide and then cut them approximately 3/4" inches long. I don't know if that is the exact size of a proper brick but it looks right. The bucket with individual bricks is half full. Watching episodes of Little House on the Prairie while I work. It's really theraputic.

Tuesday, July 24, 2012

A couple hundred done, only a couple thousand more to go...

Well I have some great news regarding my Gloucester. Last weekend I got almost all of my furniture and belongings into storage. Family came together and helped me a lot. While doing it my mom asked me what I was going to do with my Gloucester. I told her it would have to go into storage too since I didn't have a place to put it while we stayed with them. She was worried that it would get ruined in a metal storage unit, in the summer time especially in the Arizona heat, so she rearranged her office and found me a place to display it and work on it while we stay with them. I am on cloud nine right now. I brought it with me and now can continue working on it. The best part was while I was setting it up my mom came in and was oohing and ahhing over it and the accessories I had accumulated for it and then proceeded to take over setting up the kitchen! I loved it! LOL.

As for the title, I decided that the Gloucester needed an update. I wasn't 100% happy with the facade. It didn't seem complete or very realistic to me. So I have been mulling it over and have made the decision to re-do 90% of the exterior. I am leaving the bottom stones and trim but will be grouting the stones. The windows and doors will stay the same except I will be adding some corbels/brackets and toppers to them. There has to be a special name for those but at the moment I can't remember.

The plaster work will be sanded down and I am covering it with red stretcher bricks and re-doing the quoins. I wanted an inexpensive yet realistic looking way to do the bricks and have decided to try the cork shelf liner trick. I have sponged the different colors of paint and have cut them into strips and have started cutting the individual bricks. Surprisingly they look just like little bricks. I am thrilled! The best part is that the liners have 1/2" square gridded paper on the backs so measuring and cutting has been super easy and I have been using  a paper cutter so making straight, even cuts is a breeze. There is adhesive on the backs but I will be adding more to makes sure they don't come up after I start grouting them. I got quite a few of them ready to go but many more are needed. I calculated out that I should get approximately 5,100 bricks from one roll. Not sure how many I will need total though. I purchased the first roll from Home Depot and was a little worried that the texture was too big and I wasn't happy with it, but I found the Duck brand at Walmart that was perfect. I think I will use the coarser one for the Quoins and the Duck ones for the stretcher bricks. I am thinking I will need to purchase one more roll from Walmart to have enough to cover everything, unless I cut some of the coarser one and mix them all together. That may give it a more realistic appearance in the end. Any thoughts?

As for the roof I will be touching up the shingles that are already installed, I can see some spots that I missed that look white. Then I STILL have to finish the chimneys, install them and shingle the back roof. The corner covers on the roof I used I am thinking of removing and using something to make the individual caps with. Having them match the colors I used on the roof will be the problem. I saw some curved caps made from a type of card online, but I don't know how that would take to stains or paint. I may try a from scratch way and see how that goes.

The inside still has a bit of work to go. I would like to re-polyurethane the wood floors, re-color the kitchen "flag stone" and grout that. Also, the nursery door needs the rest of the trim installed. The bathroom needs the tiny baseboards put down, the small wall by the bathroom door needs the paneling finished and I have to paint and install the door and it's trim. Otherwise I think I will leave the interior alone and focus on the furnishings and accessories. The house has finally settled on a time period. Turn of the century, around 1902, since I have a reproduction Sears and Roebuck Magazine from that year. I was debating on changing out the lights now but I have had such a bugger of a time with them that I think I should leave well enough alone. The kitchen and parlour fit the time, the dining room is iffy but the nursery, master bedroom and bathroom don't, I don't think anyways. I ordered a hob grate for the fireplace and am excited to see that in place once it arrives. Sorry I don't have any pictures unless you'd like one of painted fingers and lot of unfinished bricks. Off to bed I go, tomorrow comes fast and I have lots to do.

Monday, July 9, 2012

Changes everywhere!

Wow! It has been months since my last post and so much has happened and changed since then, including Blogger it seems. A quick re-cap. Surgery and healing has gone wonderfully. In physical therapy right now to get my foot to not hurt when I walk, taking longer then I thought. They said I had RSD but were surprised since my surgery was in February and it wasn't that long ago but when I told them I had had the tumor since 2008 at least and have always walked "funny" they said it made sense. So that's going good.
However, on a home front note after much consideration we will be living with family for awhile while we work on getting a new home. Sadly this means everything we own will be going into storage, except clothing and our bed. This also means no more large scale minis. All the unopened kits are being safely stored away for our new home. I have to leave the Arthur for last to make sure I have the room to store it. I have been keeping all of my small scale kits with me and fortunately will be able to work on those to keep me from going completely stir-crazy. I need an outlet or I stress and get snappy.
I have been making minimal progress on any crafts at the moment, working full time, with two kids and trying to go through a house of stuff. How can a small family like ours have so much stuff?! It's insane! I have come to realize I am huge pack rat. And on that note I have been considering treating myself to another detailed quarter scale house to work on later heehee. That's the great thing about 1/4scale and 1/144 scale dollhouses, they take up so little space and are easy to store away. I am looking at a few kits, the Tea Rose Too and the Avalon dollhouse. Not sure which I will get if either but I have a small bonus coming from work and I think I have been under quite a bit of stress lately I deserve a mini treat.
I found a new blog I am reading http://snippetsfrommystudio.blogspot.com I had to start from the beginning I love her work! What an inspiration, it really makes me want to finish my UFO's. I did decide to start the landscaping of the Pickett Hill. I have the base painted, the flower beds are cut out and glued in place and the "shell" path is laid. I snag a few minutes here and there to glue something or paint something small, it's not much but it works. Besides always thinking of or working on minis I am stitching a Headless Horseman Sampler as a gift. I had bought the pattern and supplies awhile ago and had started it and set it aside but I dragged it out a couple months ago to finish and I have gotten quite a bit done on it. Well, there's not much to report or show at the moment. Now that I have my laptop with me I hopefully will be posting more often with pictures to prove I haven't been slacking. Till next time.

Friday, May 4, 2012

Still here

Well it has been awhile since I've been on here but I am still around and still working on my minis. I have a few new pictures I'll be sharing soon plus a few more projects even though I made myself a resolution to not take on any more. My foot is almost completely healed, in fact I'm down to one crutch which I don't use when at home. Although I limp badly I have made some great progress. The pain I get is located on the right side of the foot and my ankle which is good since the surgery was more centered. My husband and myself have some plans for our real home, landscaping, decluttering and geneal fixing up. I look forward to go home for good but will content myself to spending this weekend at home. We recently rented a storage unit and I am itching to get home and box up all the stuff I don't want to get rid of but don't want cluttering up the house either. Our home doesn't have a place to store things like Holiday Decorations so this unit will be a life saver. Fingers crossed if all goes as planned we will be able to sell our home and move closer to our work. Currently it takes me close to 30 minutes to drive to work and hubby closer to an hour. Killing us with gas prices. I feel like I'm finally going to accomplish some major personal goals soon and it is a great feeling and it will be even better once I get at least one checked off my list.

Sunday, February 26, 2012

Spring Cleaning Fever

Well I've come down with it and it's horrible timing as I can't actually accomplish anything. It's that time of year when I stop and assess my art room. I have come to the decision that I do not have the room to display anymore full scale houses and I have to decide which I will be keeping. My list of unfinished and unstarted houses is outrageous so I have narrowed it down to the following, the Gloucester because my son helped paint the windows, doors and other assorted trim and my dad helped with cutting and installing the base trim, the Holly Ann which I will be receiving as a Christmas gift from my parents and plan for this to be my heirloom dollhouse, and my Pickett Hill dollhouse are all on the keep list. I am trashing the Fairfield and have replaced it with the Sea-Side villa in half scale and I also will be receiving the landscaping kit for the Pickett Hill and the quarter scale This Olde Shoe. I purchased these with my allowance money from my tax refund this year. These are on the keeplist too. I will no longer be allowing myself to purchase any more full scale kits and the remaining 1/12 scale houses kits I have will be gotten rid of. My Arthur house is hanging in the balance. Because it's so small and I am dedicating it to memories of my childhood I'm leaning towards keeping it. Listing it out like this doesn't seem like I am giving up anything but the kits I will be giving up is at least double this size possibly triple. I will continue to build quarter and micro minis and will be putting them up for sale in my Etsy shop but I really want to focus on completing to the best of my ability the houses that truly having meaning to me. The Orchard House is still on the someday list but it will be someday way in the future. Making this list and putting it out there at least makes me feel better and I'm sure my husband will be thrilled to realize I am going to stop hoarding kits and focusing on only a few. I think he'd be even happier if I only kept one but that's not going to happen LOL. Cutting back to 1 or 2 per scale is a huge jump to me. Each scale is so different and you have to approach them in different ways as to what works that to me they don't count as the same hobby but each scale is separate to itself. Hubby and others may not see it that way and it's even hard to explain in writing but there it is. now that this decision is made and my list of what needs to be done is started I feel like a huge relief has settled over me. Sorry there were no pictures to post and this was a total babble post but I have made progress on the Gingerbread Mansion 1/144 scale so I'll be taking photos soon to share and this will be going up for sale. As I work I have the thoughts of lavender and lace so she will be done up in total Victorian Painted Lady style.

Friday, February 24, 2012

Recovering...


Well I had the surgery on the 13 th of February. It was an outpatient procedure that took a little over an hour and a half to complete. They did cuterage and removed the lesion and replaced the bone with a calcium supplement. The foot is very sore but with the painkillers they gave me I feel fine. Currently it wrapped like a huge mummy and I am stuck wearing HUGE legged sweats just to get the leg part over my foot, I refer to them as my clown pants LOL. The doctor office called this morning with the pathology report . All she was told was it was a benign lesion and he would discuss everything in more detail Tuesday at my follow up appointment. I have my fingers crossed that I will graduate from the mummy cast to a boot. At least so I can wear some different clothes : ) typical female right? I will also need a refill on the pills. I' m rationing them out to cover the next week, I always feel like a complainer when I say I need painkillers. Silly I know. Here is a picture of my foot wrap, and some of the completed furniture kits for my Lydia Pickett House that have been keeping me busy as I heal.

Sunday, January 22, 2012

Pickett Hill Furniture


I am loving working on these little kits. I'm planning on saving most of these for if I need surgery on my foot, which is most likely going to happen. There is quite a stash collecting for that time, of little projects I'll be able to do while recovering, things that won't require me to stand. I've got 3 Betterly Secret Book kits, a Christmas tree kit, and a whole lot more furniture for the Lydia Pickett, as well as 3 plastic Star Trek models I'll be making up for my brother. As of right now I only need Emma's Bedroom, Robbie's Bedroom, Artist Wall cupboard and the kitchen for this tiny house and it will be complete. I still want to get the landscaping kit that goes to this but that will be sometime in the future as it's quite expensive and I'll need to save up for it.
As a present for next Christmas my mom has gotten me the 1/12th scale Holly Ann by The House that Jack Built. I'm super excited about this house. It was on sale through Tuesday Morning at an amazing price. It will be my "heirloom" dollhouse. I will be taking my time and doing it up properly. The design is so much like the Fairfield which is the main reason I fell in love with it but being so large it will definitly take some planning on where it will be displayed. I'll also be measuring my doorways to make sure once built I'll be able to move it if I had to. LOL I'd love to fit it up with as many Ray Storey lights as possible. His work is absolutely amazing.
At this same sale, before my mom surprised me with the purchase of the Holly Ann, I had bought myself an early birthday present of the Kotton Kandy also by The House That Jack Built. I'm planning on making it a small shop. I've been reading some books by Gil McNeil where the main character owns and runs a knit shop and has a knitting group that meet once a week to knit and gossip. She's titled the group the Stitch and Bitch. Which is the main inspiration for this little shop. The novels are very nice and I have devoured the first two and just started the third. I'm not too sure why I like them so much as there doesn't seem to be much action/excitment going on, but more of a chronicle of a single mother trying to move on with her 2 boys after her husband gets a promotion, tells her he wants a divorce because he's been having an affair for the past year, and then is killed in a car accident right after disclosing all of this to her. I read the first one free through Amazon's Kindle Lender's Library program. After all that rambling here are some photos of the progress I've made on the furniture kits.

Monday, January 2, 2012

Onward march!

Well today has been super productive! I got the posts cut for the "support" kitchen counter posts, painted and shellaced. The kitchen flooring installed and I used siding strips cut down, installed on a cardstock, stained and varnished all ready to glue in place. I also cut the buffet counter and have it ready to stain, ran out of my golden oak stain though. I think that would be the closest match to original counter tops but we'll see. The seam of old and new counter will be concealed with a short tile back splash once I figure out how to do it. Also, the risers for the stairs have been corrected, glued in and are currently drying before I give a final coat of white paint to them. Because of the color of the floor I restained the treads in Early American stain to match better. Originally I wanted all the wood work to match the kitchen counters but I didn't have enough stain for that and was too impatient to wait till I could go pick some up. Soooo new plan. I think it's better this way now. Not so matchy-matchy and gives more seperation between living room and kitchen. The holes that were in the front wall from the porch installation have been filled and textured. Hopefully, I'll be able to paint all of the downstairs walls. That'll leave the interior window trim, baseboards and crown moulding left to do. For a few hours of work not too bad.

Sunday, January 1, 2012

Bringing in the New Year....

With a nice clean artroom. Here is couple views of that room. This took all day yesterday to get to this point. Trust me this is much better now, for one thing you can see the floor! I almost forgot there was one in this room. The first picture is my little helper sorting pieces to the low table I got for Christmas I need to put together. I think it will fit where the folding table is and it matches the bookshelves. The Arthur will get finished and then moved to a different table in the other corner of the room and then the Harrison will sit on this table. It's almost a perfect fit in that place, just have to move the white drawers and the desk over about an inch. I know having a dollhouse directly in front of a window is a no-no but it's not forever so I can live with it for awhile.

This picture (don't know why it's sideways) shows the bookshelf with all my mini books on the second and third bottom shelves. The room on the top is the first of a Plastic Canvas Barbie dollhouse I've been working on.

Overall shot, notice the floor? That's a relief.


And here are two shots of Christmas morning. Here's Elora with a chocolate-y face. We gave her one piece of Chocolate from her stocking. Turned our backs for a second to get more presents from under the tree and the little buggar had five empty wrappers on the floor and was shoving the fith piece into her already packed mouth LOL. Talk about a sugar high!


This is one of my favorites. Aidan emptying his stocking while his sister cheered him on. I love Christmas!