Wednesday, December 28, 2011
$50....For a phone number?!
Well, today I had my appointment with the specialist, who actually seemed to know what he was talking about. However, where my problem is he wouldn't be able to work on it and reffered me to an Orthopedic Surgeon. So there went $50.o0 for a phone number. At least he was honest. So tomorrow I will give this other guy a call and see what he says. This doctor said if it wasn't hurting these types of things they'd put under observation but since it does hurt and has for quite some time he thinks they will suggest cuterage. We'll see I guess. He did seem very optimistic that it is just a benign bone cyst so that's a good thing.
Thursday, December 22, 2011
Early Christmas Present
Well my DH let me have one of my Christmas presents early, a new camera. I picked it up on Black Friday. He was at work and I was snagging some sales for the kid's Christmas. (Side note, Black Friday is SCARY!) As I was walking through the aisles my brother picked up a camera and showed it to me. It was too bulky, like the one I have and never use because of the size and the many options you have to manually select for good up close mini photos or even photos of the kids. I said I'd rather have a small one I can carry with me easily and it has to be red of course but I wasn't there to buy for myself. He said, "Oh you mean like this one?" and proceeded to pull a small box off a shelf in the toy department where it had been discarded. I snatched it from him, it was PERFECT, ran to the scanner thingy that tells you the prices, after a minor moment of shock at how inexpensive and a few choice words to my brother about tempting me with stuff, I slid the camera into my pile of gifts, picked out a Pink Paisley case and SD card and proceeded to check out. I saved close to 30 bucks on this camera. I believe it was 40 total. Guilty isn't the word for it. I had bought myself a present when I was supposed to be focused solely on others. When I got home I handed the bag to DH and told him to take it, wrap it and then hide it from me till Christmas so I wouldn't be tempted to sneak it early. Last night he asked me if I wanted to open a gift Christmas Eve and I said yes I know exactly which one too. He laughed and said to open it now so I could get used to it and be able to use it Christmas...besides he hadn't wrapped it yet anyways. = ) I tore into it like a wild animal and started snapping random pictures to see how it worked. At the store, I had a hard time understanding what I was reading, (I blame it on the time it was 2 in the morning) and was really worried it was going to be a bad deal after all. Boy am I glad I was wrong! The zoom feature which on the box was stated as 5xPanoramic zoom really meant 5xOptical. It's been only 8 years since I worked in the photo lab but so much has changed since then apparently and I don't use that feature often anyways but I hate digital zoom. My biggest complaint about my old camera was that if I wanted to take a nice photo of a mini project I had to flip through all the settings to get to it and then remember to flip it back so I could take normal pics later. This camera does it for me and the picture quality is much better. I took a couple of the furniture waiting to be painted and my finished "Not so Tall" bench.


Wednesday, December 21, 2011
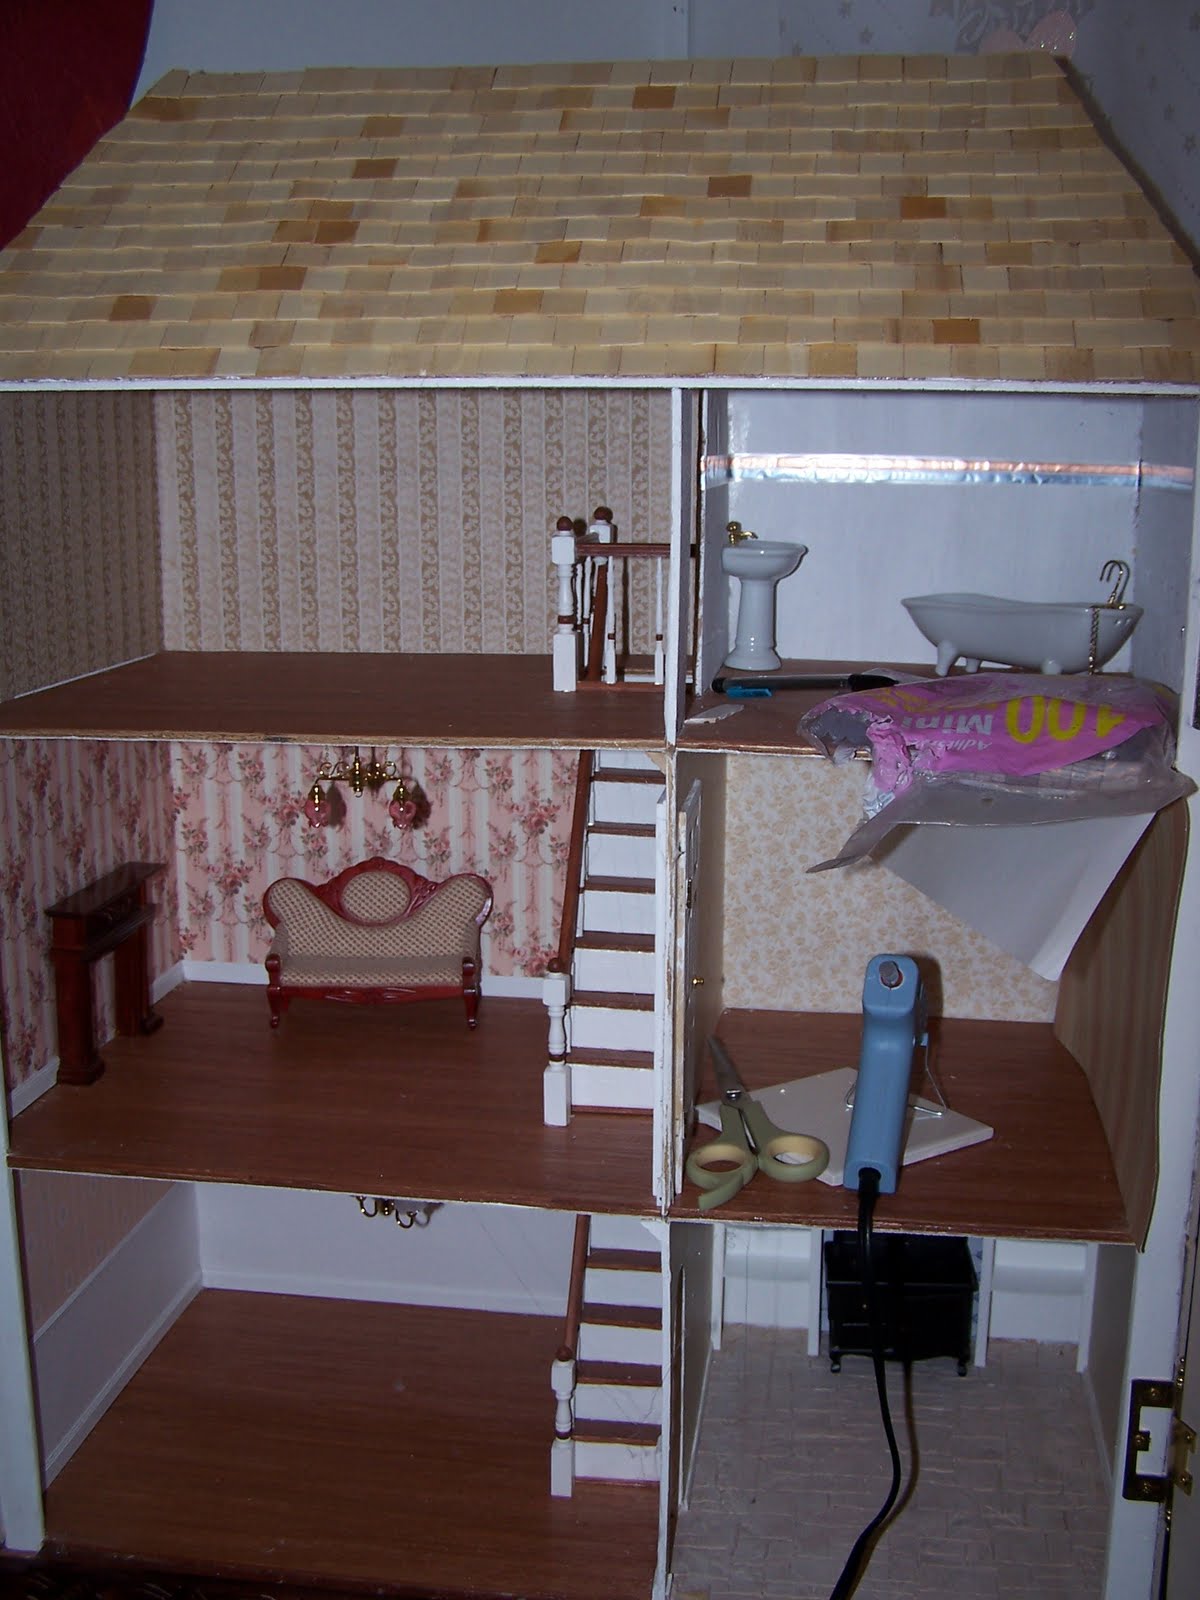
Christmas is almost here!
Well, Christmas is almost here and I just finished all of my shopping. I've been working on the furniture for my Lydia Pickett House. About time right? LOL I finished the "not so tall" bench for the front porch and FINALLY installed the porch and portico rugs. I spent last weekend modge podging all of the paper decals for the kits that I have so when I get to them I don't have to wait for them to dry before completing something. I also put together the Al Fresco Dining table, side table, fireplace, mantle frame and the tiny boat for the mantle piece. I did learn that exhaling sharply when working on a teeny tiny boat is a bad thing. Little bugger went flying across the room. I spent quite awhile on hands and knees searching the carpet. Finally found it and fortunately it was all good. Now these pieces are all ready to paint. = )
I've been trying to get the RL house all cleaned for Christmas weekend. That way I can relax and enjoy myself. Which is why I haven't been working on the Arthur lately. I know if I go into my craft room for "just a minute" I'll be emerging hours later with no house work accomplished and too exhausted to clean. LOL. At least the furniture I can bring in and set up on a TV stand and since it's in the living room it gives me a view of practically the whole house so I can't forget that it's a mess. This way I can still mini and clean at the same time. Been working like a charm. I'd get more accomplished cleaning wise if I put all of my crafts away but then my disposition would go down the pooper and stress levels through the roof. Safer to compromise with myself.
Also, when not cleaning or mini-ing I've been reading. Just finished Daughter of the Forest by Juliet Marillier. Loved it! It was rather slow in parts but after a certain point it picked up and I couldn't stop thinking about what would happen next. I may have found a new favorite author. Already added quite a few of her other books to my wish list. I caved awhile ago and agreed to let my husband buy me the Kindle. I was adamant that I would never like it and it was horrible to ruin the experience of reading a book, the feel of the pages etc etc. Well I still love reading an actual book more but the Kindle has been wonderful since almost all pre-1923 books are free and those are the ones I most like to read. And then, as if that wasn't great enough, they come up with the lender's library. Where if you have Prime membership with Amazon you can read 1 free book a month off of their list. My December choice is Water for Elephants. Just a few weeks ago I almost bought it, have been tempted off and on since to do it and then found it on the lender list for free. I wasn't sure if I'd enjoy it enough to pay money for. This way is much better. Almost $80 bucks a year for Prime membership but with how many orders myself and my husband place it's paid for itself in 2 day shipping and other incentives.
Saturday, December 10, 2011
The Good, The Bad and The Tumor....?
Got the results back yesterday afternoon. There is definitly something there and it's not scar tissue. There were 2 differentials suggested, a chondroma or slow-growing giant cell tumor. My dad is a PA and a realy really good one at that; better then the doctors I have seen, and I'm not being completely biased either. So I took the disc with the x-rays, and MRI on it to him for his opinion. After comparing my images and symptons to those on the AAOS website it looks like it is either an aneursymal bone cyst or a slow-growing giant cell tumor. Good news is that those are normally non-cancerous. Bad news they most likely will need surgery to remove and depending on how big and destroyed the surrounding bone(s) is/are will depend on how intense the surgery will be. I have an appointment Monday morning with my FP doctor to disscuss the results and we will go from there.
I, of course, am nervous. On the results from the Radiologist who read the MRI he suggested a biopsy or resection and if that wasn't what the doctor wants then at least have another MRI in 4-6 months. I am all for getting it removed. It had already started to bother me before the x-ray but because my Pediatrist told me my foot was fine and there was nothing there I never persued it, thinking it must just be all in my head if they can't see anything. I'm a bit pissy about that right now. Although it doesn't appear to have grown and the report says it has been stable since April of 2009 it could have been different and that bothers me. I would rather just skip the biopsy and go straight for removal. One, biopsy includes a freaking huge needle, see the last postas to how I'd handle that. = / Two, if they do a biopsy more likely then not they would come back and suggest removal anyways to reduce the risk of it becoming something worse, so I would have been subjected to the ginormous needle for nothing. At least with the resection they would put me under without me having to be deal with anything bigger then an IV. Slice and dice away but stay away from me with needles. LOL. Weird I know but hey, who can rationalize an irrational fear?
My poor husband, last time I broke my foot I had to stay at my parents house for the recovery period. Couldn't drive with the boot on and his and my work schedule, plus the baby and the steps leading up to our house, made it impossible for me to safely stay at home. So every time I trip he begs "Please don't break your foot! I don't want to live at your parents again!" HAHA imagine his face when I got back and said "Don't worry hunny, my foot's not broken this time but I may have a tumor in it and may have to have surgery. So guess what!? That means we get to stay at my parents again!" Yeah I'm a little evil. LOL He's a sweety though, he didn't even cry! ; )
Friday, December 9, 2011
RL strikes again...no time for minis : (
Well, I've no progress on any mini projects to report and haven't had a chance to upload any pictures of either my kids' adorable costumes because I have been so extremely swamped with work and RL lately. Mid November I had to fly to Boston for a business trip. I hate flying but it's amazing what a double shot Strawberry Margarita can do for your nerves before take off LOL. My sister-in-law was able to fly out with me and when I was finished with work we had a great time. Not much sight-seeing was done as it wasn't their "season" any more BUT I did get to go to Orchard House and Authors Ridge in the Sleepy Hollow Cemetery. I about cried being able to go inside Louisa May Alcott's house. It was absolutely amazing. It also doubled my resolve to build this house in miniature. I even bought a set of simple saltbox dollhouse plans that will work wonderfully for the basic shell with minor alterations.
On a more serious note, I once again injured myself. I tripped over a sub-woofer at my parents' house. Thought I had broken my baby toe and possibly the side of my foot. Right foot AGAIN! So not wanting to be as stupid as last time and walk on a broken foot for 2 1/2 months before getting it fixed I went to the ER the following morning. Figured they'd have to wait for the swelling to go down a bit before they could check it anyways. While there they took an x-ray. From just looking at it they were pretty sure it was broken or dislocated, but amazingly neither was true. However, they did see something "abnormal" on the x-ray and scheduled me for an out-patient MRI to rule out tumor. NOT something I was expecting. The guy did ask if have had any pain in my foot and my immediate reply was no. As I was leaving the ER it struck me that maybe the achy feeling I've had in the area of my old break was what they were looking at. I had actually gone in after the break had healed to see if there was something wrong because at times it would feel like it was broken again, they had told me the break healed fine and there was nothing there and it was probably just sore tissue from the break taking so long to heal. I immediately got the earliest appointment for an MRI and copies of the new x-rays. I popped the CD onto my PC and found a strange circle-like thingy (no other word to describe it) about the size of a nickel smack dab in the center of my foot. I also was able to take a look at the older x-ray I had had taken when I complained about my foot after it healed and the same thing was on that x-ray except it was lighter and slightly smaller. I'm a bit pissed that I've gone this long with something like that and getting pretty much blown off last time. I have high hopes that it will just be scar tissue from the break but it's still frustrating for the other doctor to ignore me like it was all in my head.
Yesterday I had the MRI. Talk about an ordeal for me LOL. I have a horrible irrational fear of needles. Just the word makes my pulse race and my knees weak. I was all set for the MRI, walked into the room with the machine and they start their preliminary questions. After the tech reviews the two conflicting requests from the imaging DR who read the x-ray and the ER DR who I never even saw and figures out what test really needs to be done, he turns and asks "Ok, you all ready for the contrast?" My legs about went out from under me. I was told it would just be a normal non-needle MRI. I was not expecting this. So after some long long breathes to calm down I laid on the table trying not to hyperventilate or cry (big sissy that I am) and closed my eyes. I now believe that having needles sprang upon me is worse then being able to prepare myself for days in advance. Pretty sure I almost passed out, at least I wouldn't have had far to go if I had. As I was laying there he asks how I'm doing and I said I was fine. That was till I opened my eyes and everything had pretty rainbow circles over it and my ears got really warm. Immediately closed my eyes, started my "calm down and go to your happy place" breathing technique. I was extremely lucky that the tech also has a fear of needles, at least when they are being put into him, and he was very good and understanding. After the IV was in the MRI was a breeze. I was never afraid of the machine to begin with. Took about 40 minutes total. And the results should be available today for me to pick up, or I can wait 3-4 business days for my FP doctor to get them, review them and schedule an appointment....hmmm.... which will this impatient patient be doing? LOL.
Friday, November 4, 2011
Two Steps Forward, One Step Back...
Or at least that's how I feel like it's going. The build was going along smoothly untill I got to working on the porch. For the life of me I could not understand the directions. So I began to wing it. Big mistake. It started off fine. I got the porch roof on, and the bottom sides on and then I got lost. I kept reading and then re-reading how to attach the posts and the front pieces. I went for what I thought was the correct way. Did both sides, glued and taped securely and went to bed. Woke up the next morning and thought something didn't feel right about it. Then as I was driving to work it hit me. I had glued everything so that the front post butted against the side post instead of on top and flush against the side scallop piece. So this pushed everything else off kilter. So after work I carefully seperated all the pieces with an exacto knife, sanded and then reapplied them the correct way. Since I was on a roll I figured I'd go ahead and do the top porch trim too. Glued and taped and went to bed. Woke up the next morning, went to look at it and wanted to bang my head against the wall. I had glued the left onto the right side and the right side onto the left. Out came the exacto knife. I finally got the pieces put on correctly but no matter how I squeezed or twisted the top railings of the porch were still too short. Thank goodness it wasn't that big of a deal since I had some spare wood about the same size. Last night I cut new pieces, painted and installed them. I also punched out all of the exterior trim of the windows and sanded them. I was surprised by how these are. Instead of one piece of arched trim it comes in 4 pieces. Top arch, two sides and the bottom ledge. It works for me as I want the sides white and the top of the arch the same color as the posts. I'm not sure how to get a touch of green on the windows exactly but I'm leaning towards a key stone on each one. The shutters are still up in the air too. I don't want a solid color but they are just a single flat piece with no decorations. Stencilling comes to mind but what to stencil I'm not sure. Do people have holiday shutters that they change out throughout the year? Can you tell I've never actually seen shutters in real life? : ) Any suggestions would be great. Here's a picture of the first porch mess up. You can see how short it made the top rails. The gable is just dry fitted here. I painted and installed it as well as the gable trim last night also.

Monday, October 31, 2011
Happy Halloween!!!
It has been a very nice Halloween. I just returned from trick o' treating with my kids. Elora was dressed as an adorable spider witch and Aidan was Captain America. They had a blast! I have some pictures of both of them I'll be able to get online in a bit. But till then I have a few pictures to share from this weekend. I had a very productive time. For some reason this house is working up so much faster and smoothly then any other house I've attempted. I'm very happy with how it's turning out. Over the weekend I was able to texture and color the exterior walls. I had to mix my own paint color as I had run out of Goose Feather by AppleBarrel but was determined that the walls be that. Sooooo after some random mixing I got the color I wanted, added some fine sand to the paint and began applying it. The whole time the images of gingerbread houses kept going through my mind and helped in the direction I chose for accent colors. The porch floor was painted a dark green, the posts and top railings are now painted Black Cherry and the main pieces of the porch are white. When I told my mom the colors and inspiration she asked "So, do the people paint their house each year just for Christmas?" LOL guess she didn't quite get the consept. It actually does look much more realistic then cookie walls, gumdrop shingles and licorise windows. I haven't decided exactly how I'll do the windows and door but they will have all of those three colors incorporated somehow. All of the porch pieces have been painted are ready for installation. I also attached the porch roof and installed the porch light as well as the kitchen light. The hole for the living room ceiling fan wire is drilled but the fan is not installed. My hand kept hitting the fan and I was afraid of accidentally breaking it. Once I'm completed with the porch I can fill in the holes of the front wall that were there for the porch pieces, fix the feathering of the inside and paint the walls. The first picture you can just see my record player in the top right corner LOL. Was alternating between Doris Day and the Andrew Sisters. At one point I had a Johnny Mathis Christmas album playing to get the mood going for the house, my husband probably thought I had lost it. LOL After these were taken I painted the posts Black Cherry and the railings that will go on top and bottom of the white pieces.


Friday, October 28, 2011
I had these attached to the previous post but for some how I must have erased them. Here is a picutre of the wall treatment as it was drying. The second picture is an overall shot with the kitchen pieces. Last night I started painting the right wall Antique White. I also installed the bottom floor ceiling lights. It was the first time I've used my Dremel Stylus. I LOVE it! Absolutely amazing!!! I just need to see if I can find a cutter bit in case I decide to add a bay window on the left side behind the stairs. My mom has always wanted a bay window. So if I can add it, it would be a touch for her. The bay ledge would also give more space for decorating, maybe even some type of window display? I'll have to think a bit more on that.


Thursday, October 27, 2011
Christmas at the Grandparents Part 1
Well the decision to hold off on minis lasted a few weeks....Then I realized that minis are a great stress reliever and if I didn't start up again it was bound to get ugly LOL. After 3 weeks of my kids being sick off and on as well as me and the mounting stress from work I caved. I escaped to my art room a few nights ago and the Arthur kit began it's taunting again. Surprise to me as I hadn't even been thinking about it when I went in there. I was actually debating between the Fairfield and the Mckinnley and had gotten so far as a dry fit with the Fairfield and marking where changes needed to be made. But I realized it wasn't going to happen. So it has once again been dismantled and stored and the Arthur took it's place on my work table. In under a few hours I had the house shell put together, the stairs moved and altered, the bottom floor dividing wall removed and the kitchen set picked out. Only hitch in my plan was that the kitchen set I've been in love with for so long was no longer available. But a wonderful person on the Greenleaf forum came to my rescue and I now am the happy owner of this wonderful kitchen. After I removed the wall I was having a hard time deciding on the wall treatment. Since the walls would now have to be covered all the way the length of the house and I didn't want to try and splice wallpaper I was stumped. Then, as I was staring at the blank walls, I got the idea to do the same technique my dad did to the walls of his house. I feathered them. Now I just need to paint them, but I am much happier then I would have been if I had settled for wallpaper. I've started painting them antique white. I will either stain the trim work like the floors or I will paint it all white I'll have to do some testing first to see which looks better. Here are some pictures of the progress so far.


Thursday, September 22, 2011
Update
Well, I have painted most of the trim to the Gloucester, started cutting the "stones" for the two chimneys and have worked a lot on the mini rug I'm making for the dining room. I added the sink I got from a greenleaf member to the kitchen and put up a few more accessories in there too. So far the bottom two rooms have gotten the most attention and look like real rooms now. But on that note I have taken a break from my dollhouse... for multiple reasons:
1.) I am really in the need to clean and organize my art room (insert scream of terror here LOL) I loose my urge to create when that room is in total chaos.
2.) I have been very busy work wise and my mind is frazzled. I will be going on a business trip in November to Boston and I can't seem to really focus on much else through the panicing of leaving my children for a full week to the arrangements of times and flights and schedules. So I've been concentrating on projects I can easily tote from one place to another, don't require a lot of thought, allow the most time to spend with my kids and still give me the feeling I'm making something, so far that has been needlepoint.
3.) The holidays are fast approaching. My son's 4th birthday is this Saturday. Time does go by so fast! I've been franticlly making to do lists and I want to have the house all cleaned, organized and homey before I leave in November so I won't worry about it when I'm not here and it will be so cozy to come home to.
4.) And finally I was feeling a tad burned out. You probably couldn't tell from here but I had done a lot of work in a short amount of time on this dollhouse and I was beginning to peter out. So the best thing for me is to take a step back, breathe.... and recoup for the next mini attack.
Although not mini I have begun a cross stitch project and strange as it may sound it's for my brother for Christmas. He's going to absolutely love it. I can't say exactly what it is just in case he checks in here but I'm going to have a ball doing it. I had to buy new dowels for my scroll frame as the project is too wide for the ones that came with it. Only problem is the old dowels were split and it made keeping the fabric tight easy. I need to find the proper way to attach it without that split. Right now it is stitched to the dowels, taped along the edge of that and then scrolled up the fabric still wants to unfurl one way or the other just enough to make the center slightly droopy. If anyone has a link or can tell me what I need to do I'd really appreciate it. I can practically do the stitching with my eyes closed but this part is beyond me.
So with my break from my dollhouse I will be focusing on other "real life" projects. I've got a list going of things I'd like to make for Christmas. As money is tight with this economy etc, I have decided to raid my stash of supplies and make awesome, home made gifts for many of the people on my list. Hope they enjoy them. Some I will be able to post pictures of here, I won't be completely gone...
Monday, August 29, 2011
An Old Roof
Yesterday I found a jar of stain and I finished the front and sides of the roof. After it was stained and dried (for once the extreme dry heat of Arizona came in handy) I dry brushed some grey over the shingles to age them and then detailed them with a bit of "moss". I'm very happy with how it came out. Found the perfect cat weather vane for the roof at EarthandTree miniatures and I will either make a bird nest if I can't find one to purchase for some place on the roof. This isn't the best picture ever, it was taken with my cell phone but it shows what it looks like. The back and chimney's still need to be finished but at least the parts that are immeadiately seen are completed.


Thursday, August 25, 2011

Mood lighting for the dining room. Last night I got tired of seeing a mess in the Gloucester so I got to work. I put a movie on from TCM and cleared out all of the rooms and then proceeded to measure and cut all of the remaining trim for the upper rooms. After they were ready to be painted and installed I let myself add the furniture and accessories I've been slowly buying for this house. I made the sideboard today from a kit.
 Here's a picture with the flash so you can really see the detail. The punch bowl is a set from Chrysnbon and the teaset on the dining table was a Christmas present from my husband.
 This is the bedroom set I purchased. It is a Melissa and Doug set, very sturdy and I'm pretty sure it's for children but I really love the detail and once I dress the bed and add the accessories you won't be able to tell.
 Aaahhhh the parlour...minus the fireplace. I decided to buy the one I found from DollsHouse Emporium and am waiting impatiently for it to arrive. It will be perfect in this room. The gramaphone in the corner is a pencil sharpner. I will be detailing it so it looks more realistic, just had to see if it would fit...Now I'm wondering where in the world the Christmas tree will go this year ; ) Guessing the kitty and birdcage will have to be re-located. I'm really getting into this now. Even started staining the shingles but since I'm using a stain pen it didn't go very far. I'll have to buy a small can and refill my pen. Then onto shingling the back roof and finishing the chimneys. Once they are all stained I'm going to go back over them with washes of black and greys to fill in the little cracks I can't reach with the pen and give it a weathered look. I've been looking at weathervanes, I've always wanted one but I'm not really sure if I can add one to this house without it looking strange. Guess it is my house and I can do what I like right? LOL Also had the idea of adding a one inch edge around the sides and attached to the front door so that I can have a teeny bit of landscaping and maybe topiaries flanking the door... I'll have to do a test run first and see if it looks ok first.
Monday, August 22, 2011
A New Fireplace
Well since I will have to wait for all of the supplies before I can start work on my Colonial bashing I have wandered back to the Gloucester. Last night I took the dining hutch and filled it with blue and white china. I want to add some fruit to one of the bowls and some rolls to another plate but so far I love the look. I then took the dining table and re-stained it a red-mahagony stain that better matches the hutch, just need to polyurethane it. As I was looking at it I noticed how little needs doing before I can call the house complete. The interior only needs the final trims installed in the Master bedroom, bathroom and around the nursery door. And the shingles need to be stained. I had attempted to make my own grey wash/stain with a rust concoction but it smelled so strong and icky I tossed the whole thing before I even tried it out. Also, as I was taking inventory of the unfinished items I ran across my fireplace in the parlour which I absolutely hate. I have found what I think will be the perfect replacement for it here: http://www.dheminis.com/dhe/product-details.aspx?code=3370&dhecode=l_fire1
I would post the picture directly but it is copyrighted. The legs to the house are unstable, it wants to tip over when the door is open if you touch the door in the wrong way. So I will have to devise a plan to stabalize the legs. My husband and my dad both suggested I add braces between the legs towards the bottom I just don't know how to do it. I will hopefully be adding some more pictures soon of the finished Christmas house and the progress on the Gloucester.
I would post the picture directly but it is copyrighted. The legs to the house are unstable, it wants to tip over when the door is open if you touch the door in the wrong way. So I will have to devise a plan to stabalize the legs. My husband and my dad both suggested I add braces between the legs towards the bottom I just don't know how to do it. I will hopefully be adding some more pictures soon of the finished Christmas house and the progress on the Gloucester.
Friday, August 19, 2011
Decisions, decisions...
Last night an order was placed for the corner moulding I need for a roof cap of the Christmas house and it will be 100% complete. I had planned to keep it for myself, even vehemently defended it against selling to my husband...and then I calmed down and realized I really want to work on my 1/2 scale Colonial dollhouse for myself. Soooo the Christams house will be going up on Etsy as soon as my order arrives. For the past 3 days I have doodling plans for changes I want to make to my Colonial. I want to add a kitchen and upper bathroom addition to the left side, a porch to the front (possibly around to the right side) and may or may not add dormer windows to the roof. I've contacted RGT for the cost of additional parts I will be needing and just have to make a decision about the porch before I can place that order. Here are my very very rough sketches. I cut and pasted multiple pictures together till I got the different options I'm debating with. I have scratched the idea of having the porch all the way around the front and both sides. I'm still debating on whether I want it on the front and right side and also I'm up in the air about the dormers. I wish I could try them out without having to pay for them LOL. Also the two lights you see on the front I've decided only one on the front and then one on the side of the addition next to the side screen door. With the dormers, on one hand the look without is simple and understated but with them it looks more like a farmhouse and would allow more light into the attic rooms. Please leave a comment with any suggestions you may have.


Monday, August 15, 2011
It's Christmas!
Well sort of ...At least that' s how it feels. I've gotten so much done on my Christmas house. Finished bricking the foundation, trimmed under all the eaves and the back edges and corners , shingled the back roof and front roof and am half way done shingling the gable. I'm really getting into it. Haven't even finished the shingles completely but had to start decorating. I made the little wreath on the front door and wrapped the porch in green garland. Planning on decorating that so it's not so plain. Also had to try out my village lights on the house. Fingers crossed they have the signs this year like last. I've got my eye out for a couple that would look really sweet in a snow covered yard. After the dreaded shingles are done, and I can find a proper roof cap, I'm going to go over the roof in spots with snow and then will add a base with wintery landscaping. I'll check out Walmart for an extra large frame to use as the base and go from there. The windows My mini record player console came in and my mom gave me a magnet stove to use. It's coming along and I'm having a ball finding those odds and ends that remind my of Christmas as a child. I'll take a picture of the record player later. I'm planning to make mini copies of my own records to display with it.


Thursday, July 21, 2011
Orchard House
As many people know by now I am completely obsessed with Louisa May Alcott's Little Women. I own approximately 13 different copies of this novel including a 2 volume set, first edition second printing. I have read practically everything I can find about Louisa Alcott and watched all film adaptations of this novel, my favorite being the 1995 version with Wynona Ryder followed by the 1933 version starring Katherine Hepburn. The colors used in the 1995 version is how I envision the March house each time I read it and every year I read this novel at least once. There is something so wonderfully inviting about the March family. No matter how I'm feeling, reading this novel sends a calm feeling of nostalgia over me.


For the past few years I have dreamt about creating a dollhouse replica of the real Orchard House in Concord Mass. where Louisa wrote and based Little Women. I have searched extensively online for anybody who has attempted this before or for kits that would work. I even attempted one from foam core last year in desperation to have my dream come true, however this didn't work out and it was trashed. Yesterday, while browsing Earthntree.com, I came across a saltbox dollhouse in 2 different scales, 1/12 and 1/2. The website picture is very blurry and hard to tell anything about it so I contacted the wonderful staff and they sent me additional pictures of the 1/2 scale completed display in their store (which I hope they don't mind me sharing here). With 3 modifications I would have Orchard House. This kit is fully enclosed so any landscaping would have to be well thought out so that the inside would be accessible. I am thinking strong magnetic closures instead of hinges on the front and back wall openings so landscaping wouldn't be an huge issue.
This first picture is the kit front, needing a gabled attic window and front "mud room" extension of the front door entrance:

Followed by the side view, one side will need a small extension, which in the pictures of the real house online contained part of the dining room and back staircase I believe:

Interior front:

Interior back:

And finally the real Orchard House:

I am beyond ecstatic. I'm thinking with space constraints my best route will be the 1/2 scale version. I realize that there is still a limited amount of non-bank-breaking supplies, furniture and accessories for this scale but I think I will be better able to create as close as possible replica. I have seen pictures of Orchard House as it is now and however much I love the "bones" of the structure the rest leaves much to be desired. This weekend (fingers crossed) I plan to start my homework. I will pop my 1995 version into my PC and begin the task of taking screen shots of as much of Orchard House rooms etc. as I can and filing it away for future reference. As well as searching online for the real house interior photos for additional room layout ideas and structural detailing. It will be awhile before I save for this kit but in the meantime I will gather as much to start as possible and know that there is something I can work for.
Friday, July 15, 2011
Wandering...
Well as the Gloucester draws to a completion my mind has wandered to my other unfinished houses. I would like to finish the houses that I've started before build begins on any others. My definition of finished is for the house to be built, trimmed, wallpapered landscaped, all ready to start furnishing and accessorizing, just as if the house is ready for the little people to begin moving in. I don't expect any of my houses to be 100% finished as I will still want to add an accessorie here and there, but I would like the structure to be finished. Where would the fun be if there was no little touches left to do? So with this in mind, I have finished the Lydia Pickett Hill, (I still have landscaping I want to do, which I know should mean it isn't finished, but I am waiting as I am seriously thinking of saving up for either the basic or advanced landscaping kit meant for this house to make it easy.)
Now I've chosen my Irish Cottage as the next for completing and was planning on waiting till the weekend before renovating and finalizing began...but couldn't : ) the house was complaining of the awfully drafty windows and the smoking fireplace. So last night I pulled out all of the furniture etc and boxed it up except the pieces that were glued to the walls. I removed the cross bars of the windows, touched up the stain, cut acetate to fit and chinked up some wood dowels for the exterior above the windows and doorway. I will need to use more joint compound for the "plaster" exterior when I install them so they look more built in rather then glued on. The windows will be leaded and finished to look like old wavy glass. Since the openings aren't perfectly square I will be doing all it all from scratch with gallery glass lead lines cut down and clear non-yellowing nail polish applied over the acetate. I also re-stained the front door and I will be add a satin varnish over all the wood work since I didn't do it before and you could really tell. I will be cutting a piece of foamcore for a base to lanscape around the house and will raise the foundation up enough to install a non-working cellar door to one side. The house is small but I want to give the impression that someone could really live there so they need someplace to store their food and anything else they may need. I'll give them a bed pan and pretend they have an outhouse somewhere and they can store the bath in the cellar heehee. I also added a hanging lantern yesterday. The wire will run accross that back of one of the beams and then out a hole I'll drill on the side with the fireplace and run it down the wall behind the soon to be chimney. I'm really happy at the idea of getting this house finished especially as it brings back really nice memories when I see it. I don't have any pictures yet, plus not much looks different yet LOL. Wish me luck!
Now I've chosen my Irish Cottage as the next for completing and was planning on waiting till the weekend before renovating and finalizing began...but couldn't : ) the house was complaining of the awfully drafty windows and the smoking fireplace. So last night I pulled out all of the furniture etc and boxed it up except the pieces that were glued to the walls. I removed the cross bars of the windows, touched up the stain, cut acetate to fit and chinked up some wood dowels for the exterior above the windows and doorway. I will need to use more joint compound for the "plaster" exterior when I install them so they look more built in rather then glued on. The windows will be leaded and finished to look like old wavy glass. Since the openings aren't perfectly square I will be doing all it all from scratch with gallery glass lead lines cut down and clear non-yellowing nail polish applied over the acetate. I also re-stained the front door and I will be add a satin varnish over all the wood work since I didn't do it before and you could really tell. I will be cutting a piece of foamcore for a base to lanscape around the house and will raise the foundation up enough to install a non-working cellar door to one side. The house is small but I want to give the impression that someone could really live there so they need someplace to store their food and anything else they may need. I'll give them a bed pan and pretend they have an outhouse somewhere and they can store the bath in the cellar heehee. I also added a hanging lantern yesterday. The wire will run accross that back of one of the beams and then out a hole I'll drill on the side with the fireplace and run it down the wall behind the soon to be chimney. I'm really happy at the idea of getting this house finished especially as it brings back really nice memories when I see it. I don't have any pictures yet, plus not much looks different yet LOL. Wish me luck!
Monday, July 11, 2011
Panelling...
Well it isn't completed but I wanted to post pictures anyways. Here is the bathroom so far. This is on the third floor right side. For some reason this room has been the hardest for me to make any decisions on. It was very specific on what it wanted when it finally decided though. I have trim that will attach to the top of the panels so that it is a nice even finish. Also, I will be adding baseboards and then the door needs to be installed and then this room will be complete, except accessories of course.

Saturday, July 9, 2011
Supplies for an Orchid Retreat
I had ordered Christine Lea Frisoni's book Le Grand Livre de la Maison Miniature and it arrived, it is AMAZING. So inspiring! I will be glued to BabelFish Translation and will have to dig up my highschool French to English Dictionary to understand the instructions as everything is in french. I looked at all the pictures last night and found so many ideas to try on my Shabby Chic Orchid. I was also pondering which lights I will be needing and the cost when a wonderful person on Greenleaf forum had a mini purge and I now have 2 hanging lamps and 2 sconces for a total of $11.00. I plan to change them from black to that white metal with lil' black spots as though the paint has chipped a bit. There was also a set of lamps that I wanted but was too slow and some lucky person got them. I now have an idea of what to look for though. To top it all off I also received the Primrose addition I ordered with the last HBS 30% off coupon. If it all works out I will have the Primrose added to the side of the Orchid for a kitchen. Then the two bottom room of the Orchid will be a small dining area and living/parlour room. I see lots of pastel colors and light. I am also searching through my many manuals and books for a tutorial on making mini Orchid plants. I will have to have at least one or two around the house as the house is named after them.
While compiling all my ideas and supplies for the Orchid I have also been working on my Lydia Pickett furniture kits and some of my Gloucester. I finished the trim in the nursery. All of the lights are installed. The ceiling paper looks bubbled in the photos but in person it looks fine. I'm not happy with the ceilings but they will do. I had so many problems with lighting this house I had to finally cut slits in the paper, groove the ceiling beneath the paper and run the wires in the groove then attempt to smoothly glue the paper back together as seamlessly as possible. Fortunatly when looking at a dollhouse most people don't turn themselves upside down to study the neatness of the ceilings...at least I hope they don't LOL. I also installed the wallpaper for the bathroom. No pictures of that yet as I'm planning on adding some panels or something similar along the bottom half of the room. Similar to the dining room but the boards will be bigger. Still have the back of the roof to shingle and chimneys to plaster but I get bored easily and I tend to wander from project to project. At least they eventually get finished, just takes a bit of time. As for the furniture kits, I am in love! These kits are so precisely made that putting them together is a dream. I never realized how massive my fingers are till I tried to put together 1:48 scale totes. Tweezers, toothpicks and tiny glue nozzles are a must as well as holding your breath. One wrong exhale and your parts go flying. The two pieces of furniture in the last photo still need to be painted and the decals applied. Sorry the post is so long, it's just been a long time since I actually had something to show. :)


While compiling all my ideas and supplies for the Orchid I have also been working on my Lydia Pickett furniture kits and some of my Gloucester. I finished the trim in the nursery. All of the lights are installed. The ceiling paper looks bubbled in the photos but in person it looks fine. I'm not happy with the ceilings but they will do. I had so many problems with lighting this house I had to finally cut slits in the paper, groove the ceiling beneath the paper and run the wires in the groove then attempt to smoothly glue the paper back together as seamlessly as possible. Fortunatly when looking at a dollhouse most people don't turn themselves upside down to study the neatness of the ceilings...at least I hope they don't LOL. I also installed the wallpaper for the bathroom. No pictures of that yet as I'm planning on adding some panels or something similar along the bottom half of the room. Similar to the dining room but the boards will be bigger. Still have the back of the roof to shingle and chimneys to plaster but I get bored easily and I tend to wander from project to project. At least they eventually get finished, just takes a bit of time. As for the furniture kits, I am in love! These kits are so precisely made that putting them together is a dream. I never realized how massive my fingers are till I tried to put together 1:48 scale totes. Tweezers, toothpicks and tiny glue nozzles are a must as well as holding your breath. One wrong exhale and your parts go flying. The two pieces of furniture in the last photo still need to be painted and the decals applied. Sorry the post is so long, it's just been a long time since I actually had something to show. :)


Tuesday, June 28, 2011
Blogger problems
I'm having issues with Blogger not keeping me logged in to make comments, even to my own blog. The only way I can comment is to choose the anonymous account, unfortunatly this isn't an option on everyone's blog. If you are able to make comments to my blog please continue to do so, I love to read them. I am hoping that this issue will soon be fixed as it appears to be a known issue to Blogger. Just wanted everyone to know if you make a comment I'm not ignoring you I just can't respond.
Saturday, June 25, 2011
Feather
Yesterday I had the sudden need for a fish. Not for dinner but as a pet. As I am notorious for bringing home the one eyed, one finned or otherwise damaged fish that live for only a few days (if that) I was a little leary of getting another. As I was browsing the fish section I came across the Betas. Normally I am drawn to goldfish but was struck by two Betas. One looked like red velvet and the other looked like a peacock feather. He even has a round red circle on his back fin like peacocks do. It took me awhile to make a decision and I still feel a bit guilty about only buying one instead of both and setting up two containers for them. However, I am very pleased to introduce Feather. Here he is, the first photo shows a better view of his tail and the circle. It was hard to take a picture of him and it still doesn't show off his unusual coloring. I know he's not technically a mini but he is tiny...


Tuesday, June 14, 2011
Ouch!
Have been really busy lately and haven't had much time to work on minis. My nieces birthday party was this weekend so packed up the kids and headed over. They live 2 hours from us so it's quite an adventure to get there with a 3 year old and 1 year old, especially when the 1 year old seems to get car sick.
As for the title of this blog, yesterday I went to the dentist and had my very first filling done. Let me tell you if at all possible it will be my last. My mouth is stil throbbing. A half hour procedure took them 2 hours. I don't know what was wrong but when they tried to numb my upper left side it numbed the lower left front and half of my tongue. Needless to say when they started drilling it wasn't pleasent. The dentist seemed a bit cranky that he had to stop and try to numb it again. The second time he got part of my upper left side and down my neck. He started drilling and apparently the nerve he was working around wasn't numb as I was getting shooting pain across to my front teeth. Felt like crying. Took some medicine when I got home in the hopes that it would help but my mouth feels like it was beaten up on one side and my ear aches. To top it off I'm a little worried they did the wrong side. At my cleaning when they found the cavity I could swear the person who does the cleaning thought the problem was with my left back tooth. When the dentist came in he said oh no that one's nothing to worry about it's this right back tooth we'll have to get in asap so it doesn't start to hurt. When I sat in the chair and he proceed to go for my left side I questioned him. He said he was double checking but that no it really was the left. Wish I could trust him but I just have this nagging feeling and if in 6 months I go for a cleaning and they say my right back tooth is bad I'm going to be one angry patient. Doesn't seem right that you can walk into the dentist without a single pain and by the time you leave you feel you've been tortured.
On the bright side when I got home and crashed, I woke to find a new kit of the month furniture kit for my Lydia Pickett dollhouse came in and 3 back issues of Miniature Collector I'd ordered had arrived. I've really been compiling ideas for my Orchid dollhouse kit. I'm pretty positive this will be my next project. I'm planning a bash of sorts and will be trying to make my own space saving stairs. I have some wonderful inspiration from the Greenleaf forum and the 3 magazines I just received. I'm going for a shabby chic retreat cottage. I ordered the bashing material awhile ago and have picked up a book of pastel textured cardstock. $5.00 and I got all of the wallpaper I need. Since I will want this house electrified but don't have the money for all the lights I will need I will be installing the wallpaper and flooring so it will be removeable. This way I can complete the house and then add the lights as I get them. We'll see how well this goes. I'm really looking forward to it.
Sunday, June 5, 2011
Klutz Should Be My Middle Name...
This weekend has been pretty eventfull. Not much mini-ing done though. Had one of those two days where everything you touch you break so was very worried about aiming that at my dollhouses. First found the duct work under the house was destroyed by stray dogs who got under our house. Then I attempted to do laundry and the dryer hose popped off the back. Found that when the room started to smell like smoke. So had to drag that out and fix it and found a ball of dryer lint trying to catch fire. Afterwards I accidentally cracked the screen of my husband/son's IPad. My three year old son has been using that since he was two and never once hurt it. I touch it and destroy it. Then I spent 30 minutes trying to fix my DVR in my bedroom as somehow I disconnected it from the sattelite signal. To top off that I went to use my glue applicator, the glue nozzle was clogged and it exploded glue all over me. At the end of all that I decided to sit on the couch for the rest of the day and sneeze my head off. My allergies have been going haywire since yesterday. I should have taken that as a sign that the weekend might not go so well...LOL Only mini-ing I have done was to seal some of the art work for my 1:48scale Lydia Pickett Hill furniture kits. Figured I couldn't really screw that up too badly. Hopefully this week will just get better from here.
Saturday, May 21, 2011
Shingles!
Lately I've been hitting a wall with the Gloucester. I kept forcing it to be something it isn't and I finally got smart and started listening. For one a time period has finally been relatively chosen. Originally I was going for early Victorian almost late Georgian feel but it wasn't having any of that. The house has decided it is more Edwardian, towards the turn of the century. I purchased a reprint of the Sears and Roebuck catalog from 1902 and was surprised at the amount of inspiration I've gotten from it. Also helped that I finally sat down and watched Meet Me in Saint Louis with Judy Garland and the set was just gorgeous. So, re-inspired I have once again started with the finishing details. The roof is 3/4 of the way shingled. I still need to finish the chimneys and attach them to the back roof. Also I have wallpapered the nursery and am especially pleased with how the striped paper looks. Exactly the colors I'd want for an Edwardian nursery. Lighting has also been completed. Each room is now lit, what a chore, I'm very happy that's finished.
On a side note I made my first 1/2 scale doll.
She was a kit I picked up at a shop for a dollar. She came pre-painted, I made her dress from scratch and wigged her myself. Her name is Penelope and she has requested I finish the Fairfield so she has a place to live LOL. After my luck with her I have also started with the Lady of the House for the Gloucester. I had another kit for her from the same shop but her face looked to serious and cold. So being me I repainted her and she is all set waiting for clothes. Apparently I also work better when I have a story behind it. Makes it easier to decide what the house needs furniture and accessories wise when I know the hobbies, likes, dislikes and daily work of the inhabitants of the house. As for the title of this post that is all I have done today. LOL I also left myself plenty more shingles to do tomorrow. I don't have any new pictures of the house so far since it doesn't look much different then the last time, but I should have some soon.
On a side note I made my first 1/2 scale doll.

She was a kit I picked up at a shop for a dollar. She came pre-painted, I made her dress from scratch and wigged her myself. Her name is Penelope and she has requested I finish the Fairfield so she has a place to live LOL. After my luck with her I have also started with the Lady of the House for the Gloucester. I had another kit for her from the same shop but her face looked to serious and cold. So being me I repainted her and she is all set waiting for clothes. Apparently I also work better when I have a story behind it. Makes it easier to decide what the house needs furniture and accessories wise when I know the hobbies, likes, dislikes and daily work of the inhabitants of the house. As for the title of this post that is all I have done today. LOL I also left myself plenty more shingles to do tomorrow. I don't have any new pictures of the house so far since it doesn't look much different then the last time, but I should have some soon.
Monday, April 25, 2011
Etsy Store!
Ok, after much thought (pushing, persuading, wheedling, and every other encouraging method from family) I have opened an Etsy store. I only have one item for sale as of yet but will be adding more very soon. First up is a 1/144th scale Queen Anne dollhouse I had posted about earlier on this blog. I will have more items up but not all of them will be miniature/dollhouse related. I have many other handmade crafts ready for sale, ceramics, beaded ornament covers, crocheted bookmarks ....the list goes on. I'm just trying to get better at taking pictures before posting them. Store name is DawningLightCreation. http://www.etsy.com/shop/DawningLightCreation
Also, I have a Harrison dollhouse kit by Greenleaf I'd like to sell. I opened the box enough to look at the instructions, nothing was ever removed but it's just not talking to me. So I would like to sell it and get a different style home, I'm really interested in the Lily dollhouse by Corona. If anyone is interested please PM me with any questions. I'm willing to ship too but be aware shipping might be a bit as the kit weighs 30lbs. Here is a link to the company website with pictures of the dollhouse kit. http://www.greenleafdollhouses.com/dollhouse-kits/harrison-dollhouse-kit.html
Also, I have a Harrison dollhouse kit by Greenleaf I'd like to sell. I opened the box enough to look at the instructions, nothing was ever removed but it's just not talking to me. So I would like to sell it and get a different style home, I'm really interested in the Lily dollhouse by Corona. If anyone is interested please PM me with any questions. I'm willing to ship too but be aware shipping might be a bit as the kit weighs 30lbs. Here is a link to the company website with pictures of the dollhouse kit. http://www.greenleafdollhouses.com/dollhouse-kits/harrison-dollhouse-kit.html
Thursday, March 17, 2011
Converting to Round Wire
Well I have completely given up on tapewire for this house. I didn't plan well at all with it. First I messed up on the third floor and shorted something out so the junction splice had to be moved but I was soooooo thrilled that was all it took to get it up and working again. Then my dining room light started to blink and when I took it off to check it the wires snapped off. And then when I tried to test the holes they weren't connecting right. Plus, after I decided to switch and started to attach the plugs back to my lights I accidentally ripped the inside wire out of my parlour light so I will be replacing this too. Everything that could go wrong with it did....SO! I am switching to roundwire! I have been thinking really hard about this, I even was thinking of trying the battery operated lights, but the idea that I would have to turn each light on and off in six different rooms turned me. Since I am determined to have this house light up I sat down tonight and figured it out. I can't remove the trim, wallpaper or flooring without redoing all the rooms and I refuse to do that. Call me stubborn or lazy but I can't bring myself to rip out all that work. So I have been staring at the house and I have come up with two solutions. The first would be to drill itty bitty holes in the back wall (all the while hoping and praying I drill in exactly the right spot) stick the lights to the ceiling and run the wire out the back of the house. Option two: I can cut some more ceiling paper, groove the existing ceilings towards the front door, run the wires in through a hole in the new ceiling paper (where I want the lights to be in the end),lay the wires in the groove, then along the floor edge, down the inside wall-lip and through a small hole in the base and then connect to the power strip. I would then cover the edges of the floor and hide the wires at the same time with some U-shaped wood trim. Even though option two sounds more convoluted I am leaning towards this. However, in the bathroom and master bedroom I was looking at wall sconces, now I will have switch to ceiling fixtures but I can't decide which ones. Because the only way to see this light will be to bend down really far and look upside down into the room I am thinking of the following (it's inexpensive yet pretty): 
For the parlour I am thinking of moving up the dining room light and putting this in the dining room :

Another option for the parlour light is this, however much I like it I'm afraid it looks too modern for my parlour:

I'm really bad at making decisions. Lights are so expensive and it's so hard to visualize what they will look like without seeing them in person I'm afraid of buying one and not likeing it. Since I'm planning on using a coupon from HBS.com I only have till tomorrow to make a decision for 20% off my order. The more expensive chandelier I'll be waiting till April 1st for 40% off. Any suggestions/opinions will be greatly appreciated.
Sunday, March 13, 2011
Busy Busy
I've been pretty busy with the Gloucester. I have shingled the front of the roof, wallpapered the master bedroom, chosen the nursery wallpaper and installed the second floor stair railings and the railings in the master bedroom. I think the paper for the nursery will work either way as I'm not sure if it will be for a boy, girl or both. There is still the sides and back of the roof to shingle and then I'll stain the whole thing. I have a grey shingle dye, I've never used this before so I hope it works. There is also the trim and door to install in the master bedroom and I am still debating on wallpaper for the bathroom. So far I'm loving how it's coming together. I love this view!
This is the striped paper for the nursery.
Master Bedroom all wallpapered and railings installed so my little people don't trip and fall down a flight of stairs on their way to the bathroom LOL
And here's an overall view of the inside.

This is the striped paper for the nursery.

Master Bedroom all wallpapered and railings installed so my little people don't trip and fall down a flight of stairs on their way to the bathroom LOL

And here's an overall view of the inside.
Sunday, February 27, 2011
On A Roll!
Now that I have the idea it's coming along quickly and I'm almost finished with the outside. Need to pick up some more joint compound for the plaster on the sides, install the chimneys, shingles and stain the celtic knot trim along the base and the outside will be complete. I'm debating on whether or not to add flower boxes to the bottom two windows...hmmmm. And on side note I got the lights to work again. It was suggested that I first move the junction splice and see if that works and it did. YAY!I have 3 rooms to finish on the inside and wallpaper coming in the mail I hope will work. I planned to switch the bathroom to the 3rd floor as the furniture looks like it's swimming on the second. Which would mean the nursery would be off of the parlour. My mother is against this and feels the nursery should be joined with the master bedroom. Not sure which way I'll go. Any suggestions would be nice. The first photo is an overall look of the dollhouse outside so far (I was busy this morning, the second is a detailed look at the front and the third is my little helper. 


Inspiration!

I've been so un-motivated and discouraged with the Gloucester, staring at the front and feeling it was sooo plain, like a box. Finally after days and days of hunting pictures and web browsing it finally hit me how I wanted the front to look. So last night I popped on the Colin Firth Pride and Prejudice and got to work. I've installed the Quoins on either side, the facias on the top and began the brick/block on the bottom half of the wall and will have the top half a simple plain stucco with possible textured stenciling above the 6 top windows in place of pediments (we'll see about that though). It still has a lot of work but I wanted to post some progress since it's been so long since I've posted.
Thursday, January 20, 2011
I WON!!!
I'm so excited! I won a contest from Julie over at http://celticjuju.blogspot.com/ and my prize is a half scale Jo March from Little Women. She does amazing work and I am so thrilled to have won. Now I really have to get going on Orchard House as Jo will need a place to live. Julie will be posting the progress of Jo on her blog, first pictures were posted today! You can check it out by copying and pasting the address above, I can't seem to get the link to post. Oh well, off to dream up plans for the half scale Orchard House....
Subscribe to:
Posts (Atom)